Saturday, July 7, 2018

Harlequin Twist Quilt

I am thrilled to share my second Make Modern published quilt- "Harlequin Twist". This quilt reminds me of summer days spent at the fair. The design was inspired by Merry-go- Rounds, Carnival Rides and Circus Tents. The colors were inspired by all my favorite treats.... Cotton Candy, Bubble gum and Ice Cream. Yummy!!!


 The quilt construction is much easier than it appears. The blocks can be made using the typical rulers that most quilters have. If you have a large 60 degree ruler, that makes things even easier.  This original quilt is a king size measuring 118" x 102". 


Me and My Mum are working on smaller versions too, which will be available for sale once we get them finished and the patterns are printed, so be sure to check back for news on that!!

If you are interested in purchasing Issue 23 of Make Modern you can do so here.


You can always get a full years subscription to "Make Modern" as well. It is an excellent value!!! Be sure to check them out here

Sunday, May 27, 2018

Tulip Fields Quilt

I am pleased to announce that I have another quilt tutorial being released on the Modabakeshop. "Tulip Fields" is a quilt inspired by the stunning Vanco Tulip fields, located here in Prince Edward Island, Canada.


My version uses the lovely "Well Said" fabric collection by Sandy Gervais. I also pieced the quilt backing using the "Well Said" panel available for this collection. 

My Mum's version using "Sun Prints" Collection by Alison Glass, is super bright and fun using a scrappier approach to making the tulip blocks.


I thought I would offer a diagram and mini tutorial showing how I pieced my backing:


I wanted the backing to be 4" larger all the way around. Because I had regular yardage each full side piece measures 41" wide. Doubled = 82". If I want 104" in width I need a section in the middle that measures 22" finished.

I was able to make 2 extra 18" tulip blocks. I added 2 1/2" strips to all 4 sides of the blocks to yield a 22 1/2" x 22 1/2" square.

From the panel cut (4) squares 10 1/2" x 10 1/2". 

From the Background fabric cut out (4) 12 1/2" x 10 1/2" pieces that will placed to the right or left of the panel squares, according to the layout.

From the background cut out (5) 2 1/2" x 22 1/2" strips to add between the large blocks and panel pieces. 

Lastly cut out (2) 5" x 22 1/2" strips to add to the top and bottom of the pieced portion of the backing.

Sew the pieced portion between (2) 104" x 41 1/2"(WOF) lengths to complete your pieced backing.

Thursday, March 8, 2018

Ribbon Rings in Make Modern Issue 21

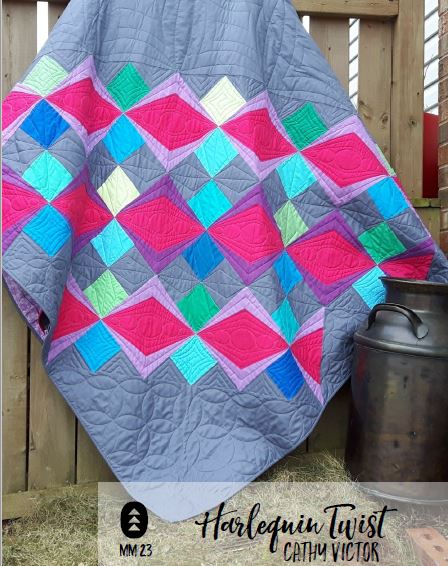
I am so very excited to announce that I am a published designer in Make Modern magazine Issue 21!!! I had so much fun designing and making these quilts. They are 2 1/2" strip friendly and go together much easier than they look. Here's the glamour shot as it appears in the magazine.....


I tell ya it takes longer than you would think to get a photo just right. The weather here this winter has been great, but sunny & non windy days are far and few between. Here are a few shots less than perfect....

I took some photos that I thought were great until I got inside and realized my mitten was in the upper left corner of every single one!! LOL. Ah winter in Canada so much fun!!


Oops lost the light in this one....


It may have taken lots of practice but I think I got a great shot in the end.

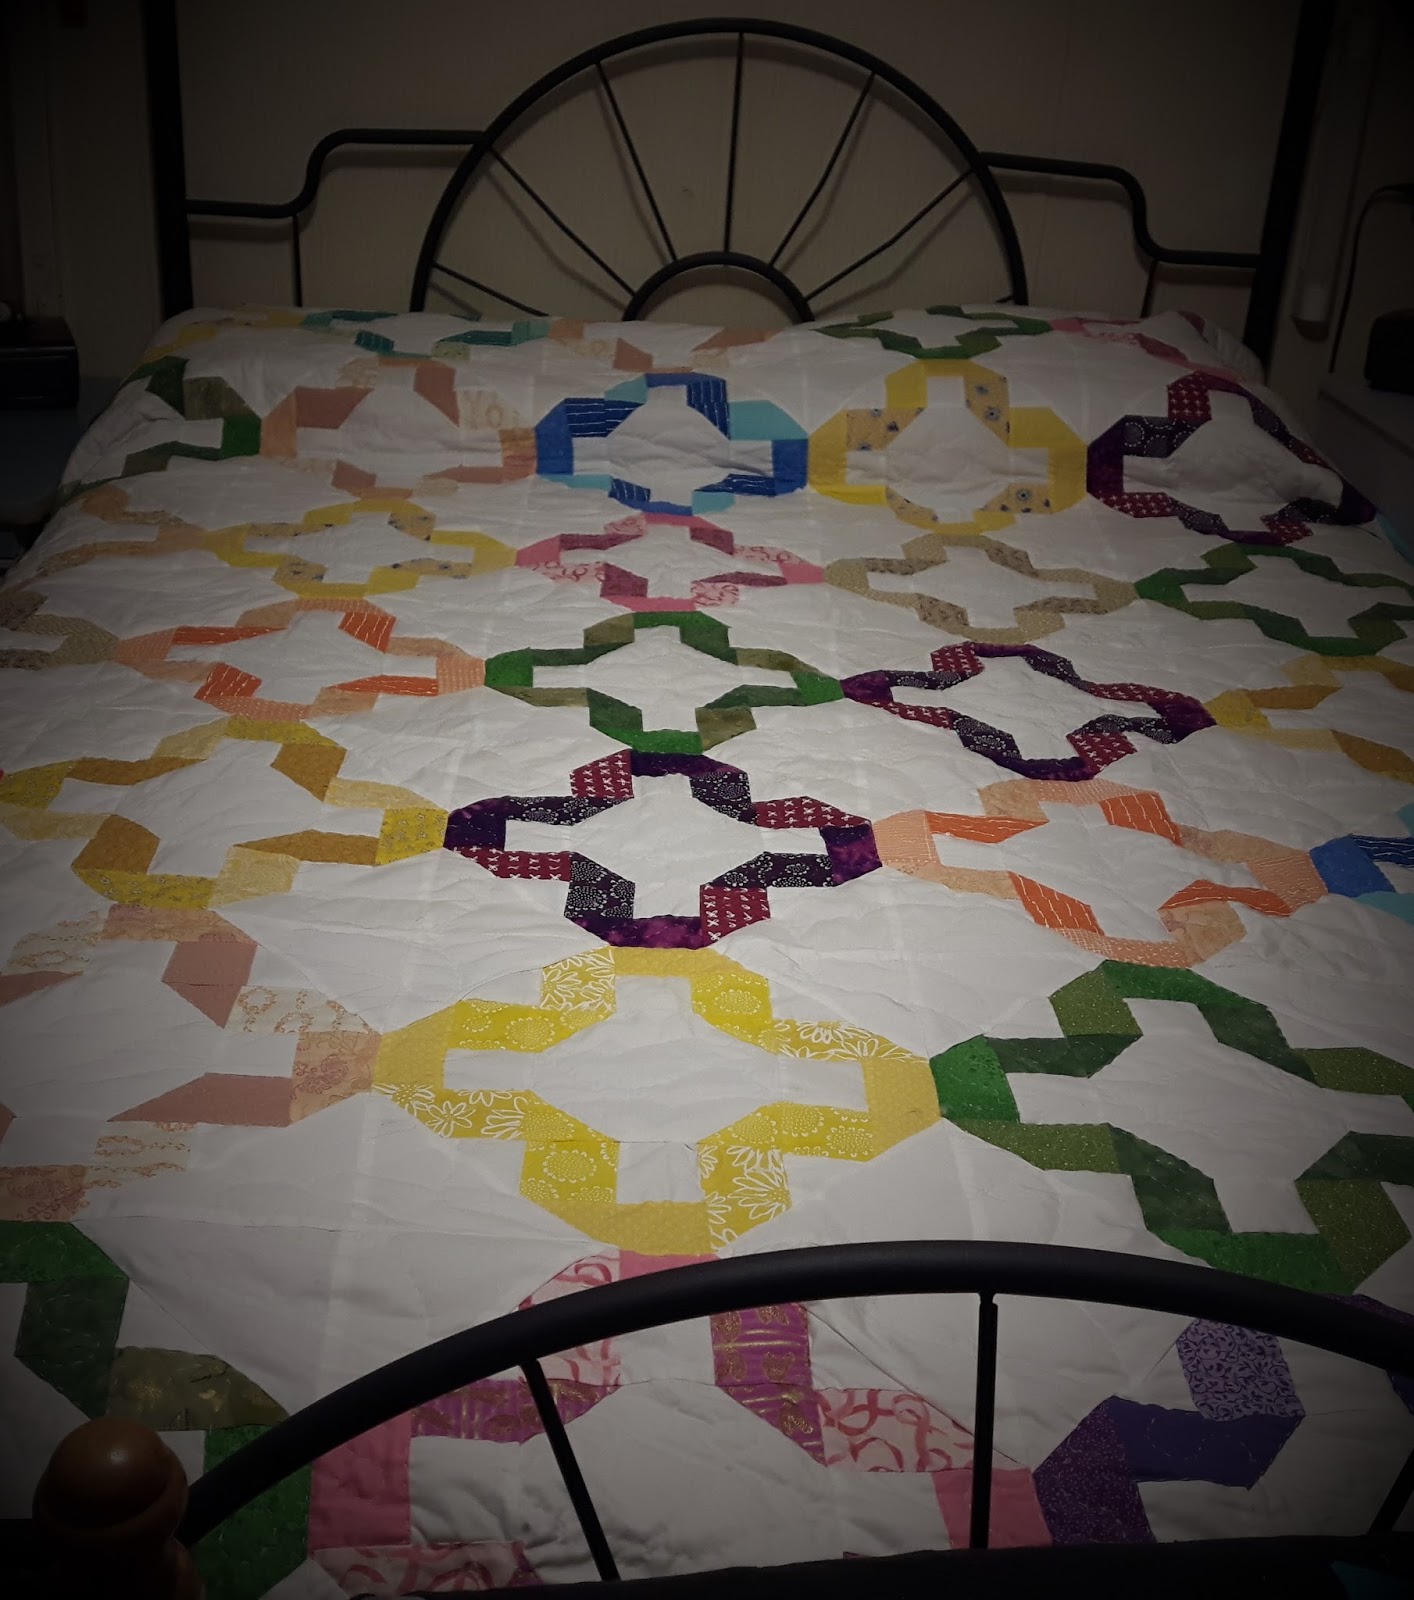
My Mum made a larger version of the "Ribbon Rings" quilt, using prints instead of solids and I think it looks pretty awesome too.


If you would like to purchase Issue 21 of Make Modern you can find it here


Want to order another Issue or get a subscription? Use the link here

I'd love to hear your thoughts on "Ribbon Rings"so please leave a comment below. If you decide to make a "Ribbon Rings" quilt, I'd love to see it too. You can send me your photos on instagram @catequilter.


Friday, February 9, 2018

Almost Finished Friday

I look back to when I "re"started working on the "Sunkissed by Spring" Quilt (Nov.3 2017), and although I couldn't work on it every Friday..... I did try my best to work on it when I was in my Sewing room and it happened to be a Friday.
 At long last I can say it is finally (Almost) finished!!! It's a completed Quilt Top and that is good enough for me!!!


 I literally have a closet full of completed quilt tops, but they don't bother me as much as the bins of half started blocks. It feels good to finally have this quilt top assembled!!! I loved the pattern as soon as I saw it, but the fabric I ordered just wasn't that great. Don't get me wrong I loved the designs on the fabrics, but the cotton felt quite thin. 

So, it went into hibernation or a time out, I don't know... I just wasn't ready to deal with it. But it occurred to me that I paid $$$ for that fabric (poor quality that it was), and it was pretty after all, so I brought it out of solitary confinement and thought to myself " hey, you've been wanting to learn how to Free Motion Quilt, and it's not like I'm going to be any good in the beginning. Why not have a not so important quilt lying in wait for the day when I want to tackle FMQ'ing an entire quilt, but won't be crushed if it doesn't turn out as awesome as I want."

So that's the plan. It can go into the closet and I know it will be there waiting for me when I am brave enough to jump in to Free Motion Quilting an entire quilt. 

Don't think that I have been keeping my Mum from having "Finish it up Friday" fun. We worked on these blocks together over the last few months and hers is so close to finished.... She noticed one of her blocks had an oops, and she knew she wouldn't be able to unsee it, so after she fixes hers up I will post a pic of hers too.

Hmm, what will my next FIUF project be??? I have some quilty obligations to see to in March, so we will see. 

Be sure to come back to see my Mum's "Sunkissed by Spring" and in March I will have a fun project reveal to share that I've been keeping secret!!